How to Make a Lyric Video for Rap: 8 Decisions
How to make a lyric video for rap: correct the transcript, split fast phrases, time each card, choose emphasis, check phone readability, and export the final song.
You play your verse and try to follow the words on a phone. The first line disappears before you finish it; the next one wraps at a strange place. Before adding another animation, stop on one phrase. Learning how to make a lyric video for rap starts with deciding what a viewer can read during the time that phrase actually lasts.
A lyric video puts the words on screen as the recording plays. A performance video shows a person delivering them. You can combine those forms, but they ask different things of the viewer. When reading is the main task, the text needs a stable place, a sensible order, and enough time to be understood.
The examples in this guide use an original four-line passage and an illustrative timing worksheet. The timings demonstrate a planning method; they were not measured from a published recording. You will replace them with observations from your own master audio. The design decisions can be implemented in a separate video editor with text controls, then tested on the actual device your audience uses.
1. Decide whether the words should lead
Listen to the section without watching anything. Which part benefits from being read? A dense internal rhyme, an unfamiliar place name, or a phrase with a double meaning may deserve a visible line. A long instrumental break may benefit from a quieter visual instead of text with nothing new to say.
Choose the central format before designing individual cards. If the verse depends on facial delivery, a performance clip may carry it better. If listeners regularly ask what you said, a corrected lyric presentation answers a real need. Neither format automatically improves the song; each directs attention toward a different part of it.
| Format | The viewer mainly follows | Useful for | A common problem to check |
|---|---|---|---|
| Phrase cards | One short group of words at a time | Clear reading and deliberate line breaks | Cards change before readers finish |
| Line-by-line lyrics | A complete lyrical line | Hooks and slower delivery | Long lines shrink on a phone |
| Word highlighting | The current word within a phrase | Following quick entrances | Highlight timing drifts from the voice |
| Performance with captions | A person plus selected words | Delivery and a few key phrases | Face, text, and movement compete |
For a first version, choose phrase cards or complete lines. Word-level highlighting can be useful, but it creates many more timing decisions. Establish readable phrases first so you have a baseline when deciding whether extra movement helps.
Write one goal for the video: “A new listener can follow the chorus” or “A listener can catch the second meaning in the last line.” That sentence gives you a way to evaluate a design beyond whether it looks active.
2. Correct the transcript against the finished recording
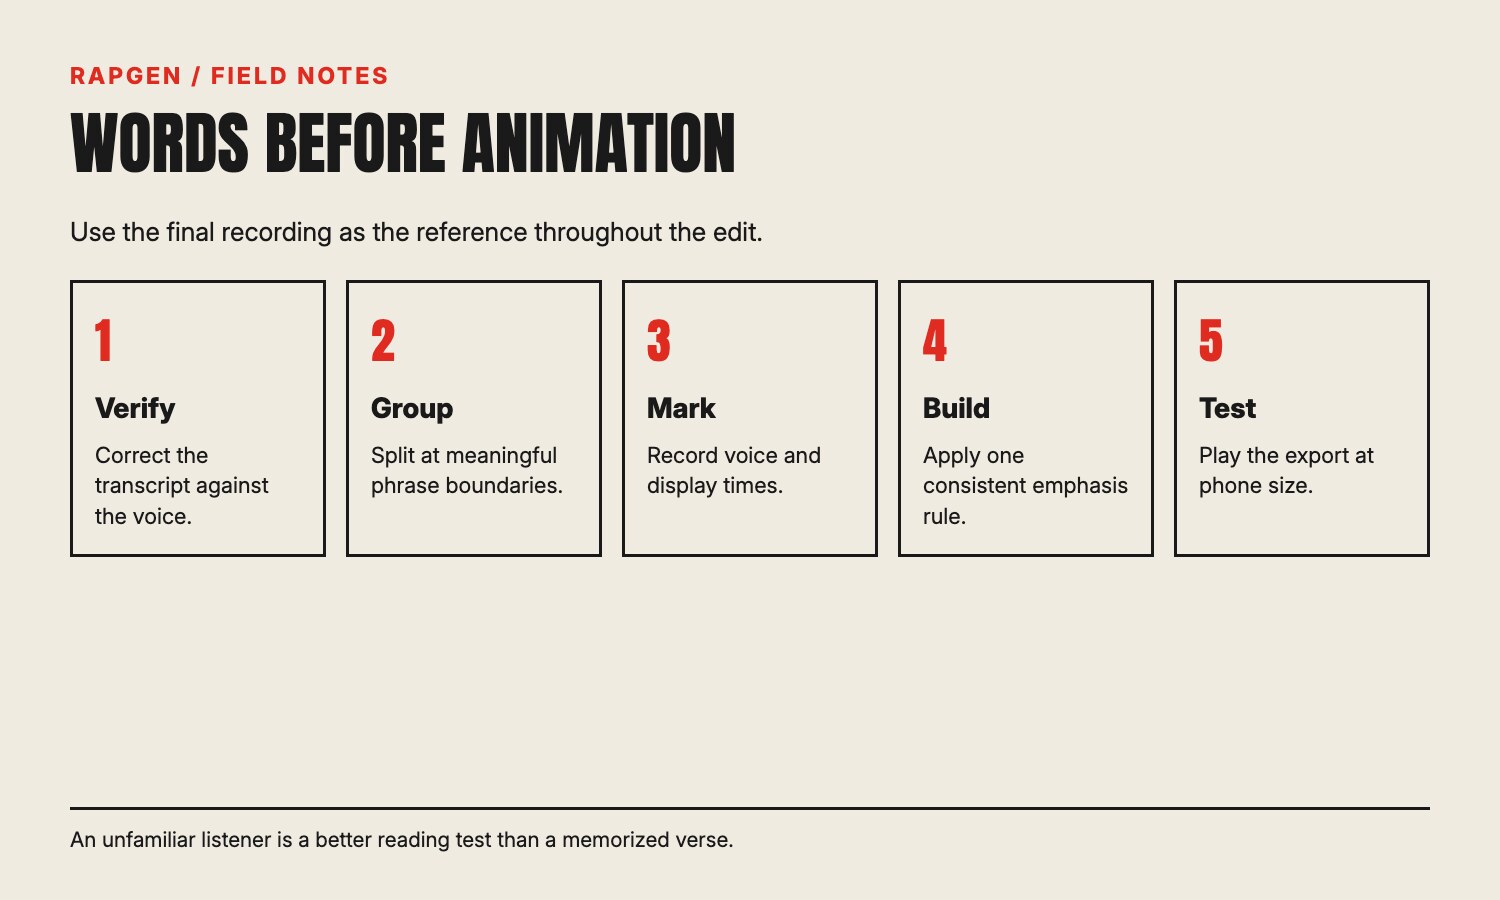
Start with the final master and the words that are actually audible in it. A writing document may contain an earlier line. An automatic transcript may substitute a familiar word for a name. Play the relevant passage repeatedly and correct the text before designing its appearance.
Our original exercise reads:
Bus pass bent, but the plan stays straight. I clock out late with a clean next page. Keys hit the counter; I leave that weight. Tomorrow gets room when I close this day.
These lines are material for the worksheet, not a claimed quotation from an artist. You can substitute your own verse and keep the same checking process.
Keep a record of uncertain words
Mark a word you cannot confidently hear rather than silently guessing. Check it with the writer or performer. If the recording itself is yours, listen to the isolated vocal if available. Resolve uncertainty before export; a stylish spelling error is still a spelling error.
Decide how to represent ad-libs
An ad-lib may arrive while the main line remains on screen. You can omit it from the lyric presentation, place it separately, or include it as a parenthetical. Pick a convention and use it consistently. Avoid implying that a background voice belongs to the main performer when that distinction matters to the song.
Preserve the performed phrasing
A word shortened in the performance may need a corresponding written form. Decide what your audience can understand, and keep names and unusual terms accurate. Punctuation can help express a pause, but it should not force a break that fights the recording. If your draft is still changing, finish the writing first; half-rhymes for rap phrases can help with the revision before the timing work begins.
3. Split a line where its meaning can survive
A line on a lyric sheet is not necessarily a single screenful. Test it at the intended display size. If you need to shrink the type to fit a long sentence, try dividing it into shorter meaning units.
For “Bus pass bent, but the plan stays straight,” two cards could read “Bus pass bent” and “but the plan stays straight.” The first supplies the physical image; the second supplies the contrast. Breaking after “but the” would leave an unfinished fragment that the viewer must hold while waiting for the next screen.
Keep a connected phrase together when possible. A person's name, a familiar expression, or the object of a verb may lose meaning when split arbitrarily. Line breaks also affect emphasis: placing “straight” alone can make it feel unusually important. Do that only if the performance and meaning support it.
Count the words as a planning aid, then test the actual reading. The first exercise line has eight words: Bus, pass, bent, but, the, plan, stays, straight. The worksheet below uses that verified total. Count a phrase directly when a timing calculation depends on it, rather than estimating from how much space it occupies on the lyric sheet.
A short phrase can still be difficult when it contains unfamiliar names. A longer familiar phrase may be easy. Use counts to spot crowded cards, then let real reading and the voice guide the final division. If the split changes the meaning, find a different solution: show two stable lines, choose a larger available text area, or simplify the visual behind them.
4. Build a timing worksheet from the voice
Create columns for the phrase, first audible word, last audible word, display start, and display end. The audio times and display times can differ deliberately. A phrase may appear a little before the vocal so a reader is ready, and remain briefly afterward if the next entrance allows it.
Use the recording as the reference. Beat markers can help you navigate, but the voice may enter before a beat or stretch past it. If you only snap every card to the beat grid, the text can feel late even when the music is perfectly aligned.
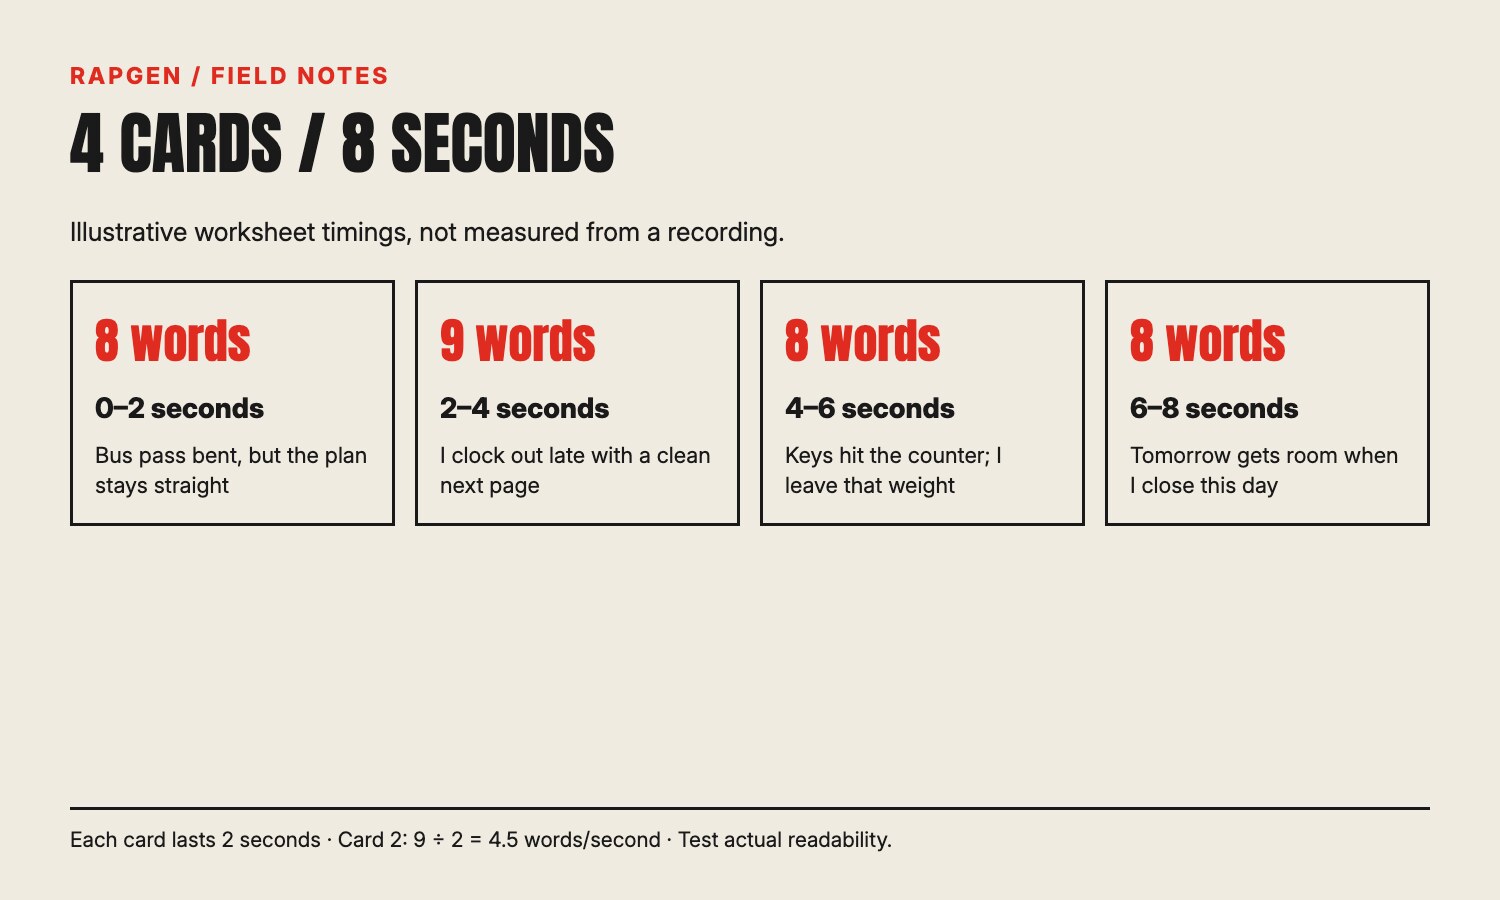
Here is an illustrative eight-second worksheet. The audio times are invented for the exercise. Each display interval lasts two seconds; all four intervals together cover eight seconds without a gap.
| Card | Phrase | Illustrative voice interval | Display interval | Verified words |
|---|---|---|---|---|
| 1 | Bus pass bent, but the plan stays straight | 0.20–1.70 seconds | 0.00–2.00 seconds | 8 |
| 2 | I clock out late with a clean next page | 2.10–3.80 seconds | 2.00–4.00 seconds | 9 |
| 3 | Keys hit the counter; I leave that weight | 4.15–5.85 seconds | 4.00–6.00 seconds | 8 |
| 4 | Tomorrow gets room when I close this day | 6.10–7.80 seconds | 6.00–8.00 seconds | 8 |
The second card asks the reader to process nine words in two seconds: 4.5 words per second. That arithmetic identifies a candidate for splitting or simplifying. It does not establish a universal reading-speed limit. Try the card on a phone with someone who has not memorized the verse, and watch whether they can finish it.
If a phrase needs more time but the next vocal starts immediately, you cannot simply extend it without creating a new conflict. Try a stable two-line presentation or smaller phrase groups timed to the delivery. The worksheet makes that trade-off visible before you animate anything.
5. Give emphasis a repeatable rule
Choose one reason to emphasize a word: the rhyme ending, a repeated hook word, or a word that changes the sentence's meaning. Then apply that reason consistently. If every card chooses a different font, color, and entrance, the viewer spends time learning the presentation while also trying to follow the verse.
In the exercise, you might emphasize “bent” and “straight” because their opposition carries the first line. You could leave the remaining words stable. In a different version, emphasize the line endings so a listener can track the loose sound pattern. These are two design choices; combining every possible emphasis would weaken both.
Keep most of the sentence stable
Use one principal type style and one emphasis style for the first draft. A change in weight, size, or accent color may be enough. When the important word appears, the rest of the phrase should remain available for reading.
Treat movement as a reading cost
A word rotating or bouncing is harder to inspect while it moves. Try holding the word still for the part of its display time when the listener needs it. You can animate an entrance or exit without making the whole interval unstable.
Check the emphasized word against the voice
The word you choose visually should feel earned by the delivery. A small connector enlarged dramatically can pull attention away from the phrase's purpose. Watch the card while listening and ask whether the design supports what the performer stresses.
A repeated hook can use the same visual rule each time. Repetition helps the viewer recognize the return. If you vary it on the final hook, choose a variation that expresses a musical change rather than merely filling the screen with new motion.
6. Test the smallest version people will watch
Open a draft on a phone at ordinary viewing size. Hold it as you normally watch a video. A layout that looks generous on an editing monitor may be cramped in a feed. Check the text without zooming in.
Try a muted pass. If you cannot read the cards without already knowing the words, inspect the font size, line length, contrast, and duration. A moving background may make an otherwise clear letter disappear at particular moments. Pause on the busiest frame and check the entire phrase, including punctuation.
Leave room around the text when preparing a layout for a particular platform. Interface elements can occupy part of the screen, and their placement can vary. Preview the actual destination when possible instead of treating one fixed margin as safe everywhere. Keep essential words away from the crop edge.
For a vertical draft, examine long lines and two-line cards carefully. A break that reads well in a landscape version may create three lines in the narrower frame. Build a separate layout when necessary. Merely exporting the same project at another aspect ratio can cut off the very word you wanted to emphasize.
Compare the muted reading pass with a pass that includes sound. Some phrases become understandable with the vocal; others remain too crowded. The goal you wrote at the start determines how much independent readability you need. If the purpose is to help a new listener follow a dense passage, testing only with someone who already knows it gives you weak evidence.
7. Reuse hooks without losing the new timing
Copying a hook layout can save design time. Copying its timings blindly can create errors. The second hook may include a longer pickup, a pause, an added response, or a changed ending. Compare the repeated section with the first before reusing every card boundary.
Mark section changes in your worksheet: verse, hook, bridge, outro. You can use a restrained visual cue to orient the viewer, such as a consistent background change at a hook. Avoid adding a section label if it obscures lyrics that need the space.
Instrumental passages can hold artwork, a simple motion, or a quiet frame. You do not have to leave the last lyric visible for the whole break. Conversely, a final line may benefit from remaining on screen after the voice finishes. Listen to the actual ending and decide how long the thought needs to settle.
For a complete song, rap song structure provides a way to think about the role of each section. Use that structure to organize your worksheet, then verify every timestamp against the final master. If the mix is replaced later, check whether its start, end, and phrase positions changed before reusing the video project.
8. Review the exported file before publishing
Export a draft and play that exact file from beginning to end. Check the first lyric, the densest phrase, the first repeated hook, and the last line. Also listen for duplicate audio, an unexpected silence, or a master that has been shortened by an accidental timeline trim.
Use a simple error log. Write the time, the problem, and the change you intend to make. “At 0:23, the name wraps onto a third line; split the previous phrase differently” is an actionable note. “Needs more energy” is harder to turn into a reliable revision.
Verify permissions for the recording, words, artwork, and other assets you include. If AI-generated music is the main focus of the video, or the visuals contain realistic synthetic content, review the external YouTube altered or synthetic content guidance before uploading there. A lyric-only presentation of an AI-generated song can also require disclosure. Apply the current requirements to both the audio and visuals in your actual file.
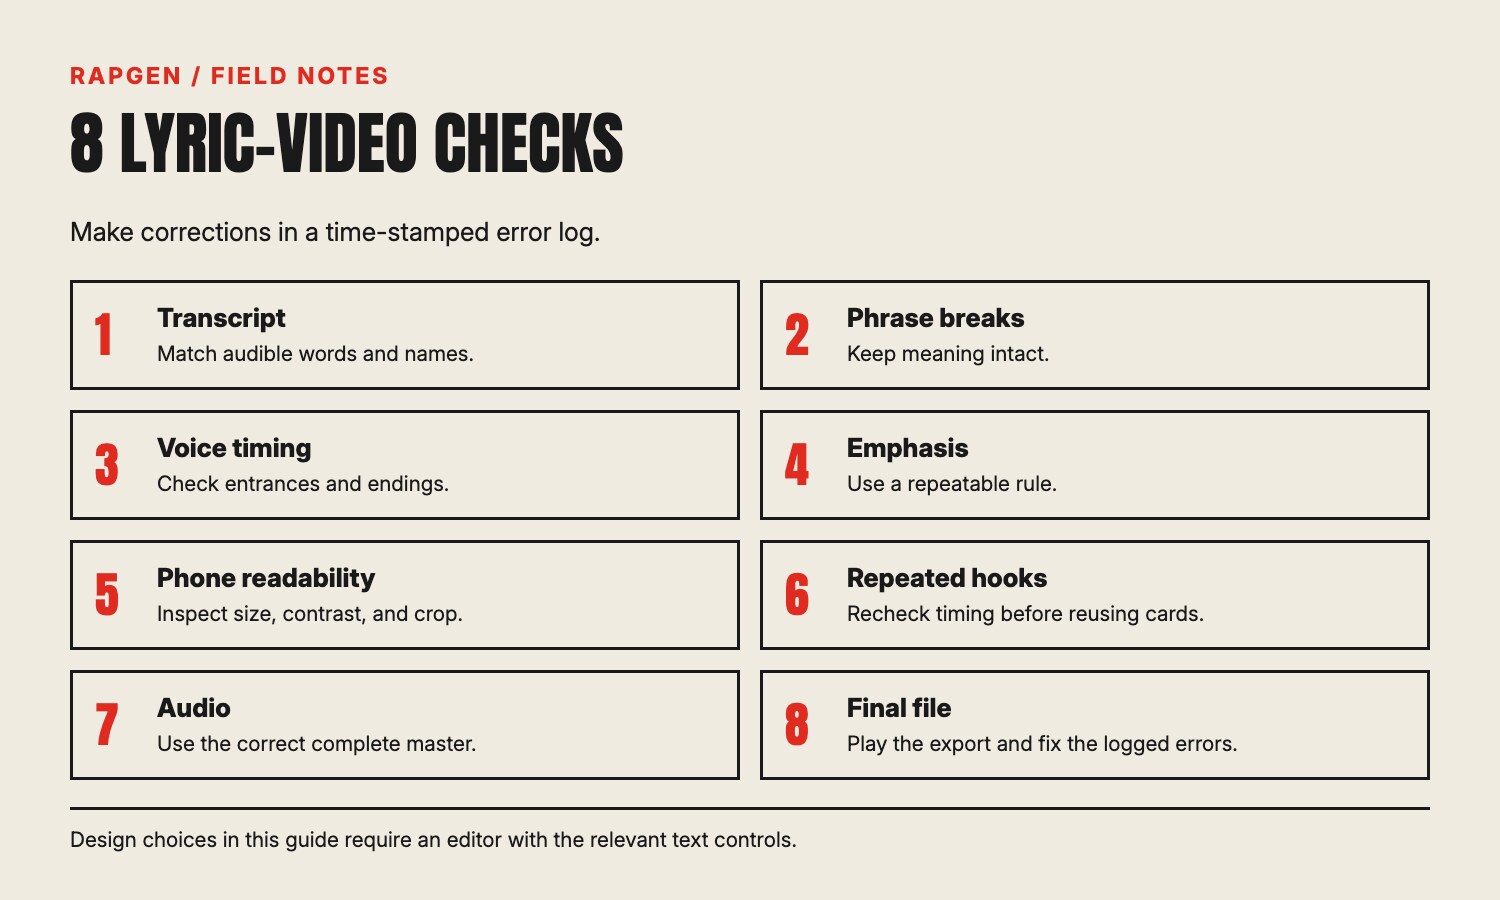
Finally, let a new listener watch the file. Ask which phrase they missed. You can act on that answer by changing a line break or a display interval. After correcting the log, export again and check the corrected moments in the new file. Keep the master and the approved transcript with the project so future edits begin from the same reference.
Three things you can stop worrying about
Animating every word. Stable text can carry a complicated verse. Add motion when it improves a specific moment you can identify.
Making every screen equally dense. A short phrase can have room around it. Filling that room with extra words or decoration gives the viewer another task.
Finishing the whole song in one editing pass. Test one hook and one difficult phrase first. The choices that survive those tests give you a useful starting style for the rest.
Export a RapGen song or build your own layout
For a song created on RapGen, the AI rap video generator offers a free full-song lyric MP4 with cover artwork. That route can give you an export to inspect against the recording. It does not supply a manual typography editor for every design decision above, and the free lyric export does not apply to an external audio upload.
If you need custom phrase cards or specific emphasis, build those choices in a separate editor using your corrected text and master. If you want a visible performer, the same page has a separate paid song-performance mode; decide which output serves the goal you wrote at the beginning.
The short version
To work out how to make a lyric video, correct the words first, split them into readable phrases, and measure those phrases against the voice. Use a timing worksheet, keep emphasis consistent, and test the smallest viewing size. Check repeated hooks and the exported file before publishing. A new listener's missed phrase gives you a practical next revision.